Hansen Solubility Parameters in Practice (HSPiP) How to visual manual top page
How to buy HSPiP
How to model Diffusion
Diffusion is a complex topic where
intuitions aren’t always reliable. This modeller gives you a versatile way to
explore many aspects of diffusion, especially diffusion in polymers. The reason
that it is included in Sphere is that HSP have a significant impact on one
aspect of diffusion, the equilibrium absorption/swelling amount, and diffusion
phenomena strongly affect some of the methods to determine HSP for polymers,
for example. These include waiting (or not) for equilibrium effects to be
attained in absorption and chemical resistance tests, for example. It’s helpful
to see all of this in the context of the whole complex diffusion system.
Permeation rate data and breakthrough times have also been used to calculate
the Hansen spheres for chemical protective gloves.
Before using the Diffusion modeller it
might be very helpful to explore the Practical
Diffusion
Power Tool. This starts off with a simple model, building up to a more complex
version. Once you are happy with those, the even more powerful HSPiP modeller
will be easily comprehended.
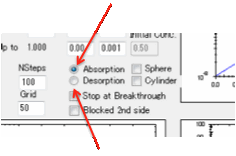
You first have to decide if you are
modelling Absorption or Desorption. Then you have to make some estimates of
key diffusion properties. If diffusion in polymers were simple, you would enter
just one diffusion coefficient (in cm² /s). But the higher the concentration of
the diffusing solvent, the more the polymer itself is plasticized and therefore
the diffusion coefficient is higher. Even this isn’t sufficient to describe the
full situation. Suppose you have a rigid polymer that is at a temperature below
its glass transition temperature. Up to a certain solvent concentration (which
you can specify) the solvent will cause a large increase in diffusion rate.
Once the polymer becomes flexible in nature (thanks to all that plasticizing
solvent) the rate of increase of diffusion coefficient diminishes. Finally, the
whole system is best described as a polymer solution (maybe constrained by a
few cross-links) with lots of solvent and the increase of diffusion rate is
even smaller. In this range the diffusion coefficient will approach the
self-diffusion coefficient of the solvent as its concentration increases. The
degree of crystallinity (if any) will affect the first stage, lowering the
diffusion coefficient as the percent crystallinity increases.
The whole system is described as:
Drigid = D0r exp(kr x
concentration)
Dflexible=D0f exp(kf x
concentration)
Dsolution=D0s exp(ks x
concentration)
Where D0r is the diffusion
rate in the rigid state at zero concentration and kr is a constant expressing
the rate of increase with increasing concentration. Concentration is given in
volume fraction from 0-1; D0f is the lowest diffusion coefficient
once the polymer has entered the flexible state, with kf, necessarily smaller
than kr, expressing the rate of increase. The terms for the state resembling a
polymer solution are obvious.
So to specify the full diffusion
behaviour of a rigid polymer you need the 6 constants above plus two the values
of the concentrations where the polymer transitions from rigid to flexible and
from flexible to solution-like are found. Where can you find these 8 constants?
In general you can’t. So we’ve provided some intelligent guesstimates to get
you started. Feel free to alter them according to your intuitions or
experimental data.
It’s debatable whether D0f
depends on kr or the other way round. So if you set kr then D0f gets
calculated or if you set D0f then kr gets calculated. Similarly for
D0s and kf.
Although all this is already complicated,
there are more complications to come! The constants D0r, D0f
and D0s also depend on the diffusing solvent. In general for
comparable size a linear solvent diffuses faster than a cyclic or aromatic one
(it’s better at wriggling into free space in the polymer) and in every case a
branched molecule is slower than a non-branched one. Finally, if other things
are equal a larger molar volume also gives a slower diffusion. There’s no
possibility of providing accurate estimates for these factors. Although there
are many academic papers on “free volume theory” they at best only give good
estimates over very narrow ranges of polymers and solvents. But it seems to us
that some rough estimates are better than nothing, especially as the effects
can be rather dramatic for the rigid polymer. To vary between the different
shapes of molecules you simply select them. But the effect of molar volume is
more complicated. The general rule is that there is a log relationship between
molar volume and diffusion coefficient. The problem is that the coefficient
varies. For rigid polymers it’s a relatively high value, which means that
diffusion coefficients can vary by a few orders of magnitude as molar volume
varies from 40 (methanol) to >300 (plasticizers). For elastomers the effect
is much smaller, maybe just a factor of 5-10, and for the gel/solution state
it’s even smaller.
Note that for diffusion at higher
temperatures, the effects of branching and molar volume are much smaller as the
polymer has much more intrinsic free-volume and free-energy to help molecules
to diffuse. Everything gets faster, but the slower molecules have a relatively
larger increase in diffusion rate.
Because you may want to play with your
own values it’s important not to override your own settings by accident.
Therefore if you want a set of default values, select your parameters then
click New. Otherwise, when you change parameters
they will simply change the relative values of your current settings.
For those who want to explore multiple scenarios
it is possible to Save and Load your diffusion settings
as .dif files. The last-used file name is shown next to the Save/Load icons.
Remember, the point about the diffusion
modeller is that it lets you test out a large variety of scenarios. What we
suggest is that you try out some of the standard settings to build up your
intuition. This should then give you the confidence to guesstimate values
relevant to your own diffusion problem.
A Diffusion
Coefficient Calculator provides an instant guide to European/FDA approved
diffusion coefficients for a number of common packaging polymers. The
calculator follows the summary provided in A
Critical Survey of Predictive Mathematical Models for Migration from Packaging by Maria F. Poças, Jorge
C. Oliveira, Fernanda A. R. Oliveira and Timothy Hogg in Critical Reviews in
Food Science and Nutrition, 48:10 (2008) 913 – 928, and uses the key formula:
The formula provides a conservative (i.e.
high) estimate of the diffusion coefficient DP depending on
temperature T (in °K) and molecular weight Mw (we use MVol as a good-enough
approximation). The data table shows Ap and a parameter t which modifies Ap as
Ap=Ap(table)-t/T.
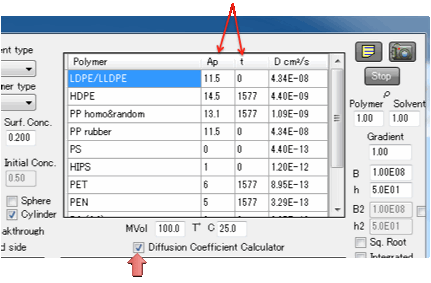
Because these values are accepted by food
regulatory agencies in both the US and Europe they are useful starting points
for “what if scenarios”. Needless to say, our own diffusion model has been
validated so that the outputs, for given inputs of D, thickness etc. are
correct. However, the realities of each specific situation (e.g. specific
polymer blends) means that no guarantees about the correctness can be provided.
Note that the formula is intended to be applied to relatively large molecules
for which there is little or no published data and not for gases and water where
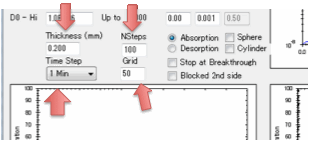
the diffusion coefficients are generally known in the literature.
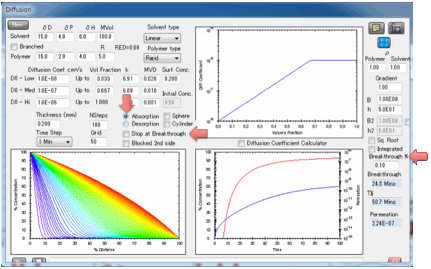
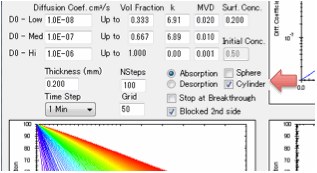
With the diffusion coefficients and
transition concentrations set you just need to know a few more parameters
related to defining your situation and the calculations. First of all, what is
the thickness of the polymer through which the solvent is diffusing. Second,
this is a numerical simulation, what grid-size do you want to use? A small grid
gives fast simulations but if they are too fast they will be inaccurate. A
large grid gives slow, but more accurate simulations. Third, what is the basic
time-step of your simulation – seconds, minutes, hours, days, months or years?
Fourth, how many of those time steps do you want to model?
Finally you need to define B which is the
(dimensionless) ratio of diffusion resistance (L/D) to surface resistance
(1/MassTransferCoefficient).
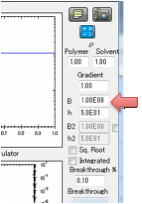
For a constant diffusion coefficient, if
B is high (100 or greater) then diffusion is limited only by the diffusion
constant of the system. If it is low (5 or lower) then the rate at which
solvent can get into (Absorption) or escape from (Desorption) the surface
becomes a significant factor in the whole process.
In Desorption mode, a low B means that
the solvent cannot evaporate quickly from the surface – either because there is
insufficient local air flow or because the solvent is high-boiling, such as a
plasticiser.
In Absorption mode a low B implies that
something near the surface (e.g. a highly crystalline skin layer, a simple lack
of effective stirring, removal of the heat of condensation) means that fresh
solvent arrives slower than the solvent can diffuse into the bulk.
When you set B, the Mass Transfer
Coefficient, h, is calculated for you. This is in units of cm/s. This value has
to be treated with some caution. B is assumed to be calculated relative to the
diffusion coefficient at the outer surface according to the starting
concentration. If you change the outer concentration then, depending on the
dependence of diffusion coefficient on concentration, h will change. The
physics say that it should be the other way round – h should be your input
value and B should be calculated from it. But most of us have little idea what
a mass transfer coefficient should be, whereas we do have some intuition about
the relative rates of diffusion and mass transfer which is captured in B.
The effect of B is very dependent on the
thickness of the sample. If the sample is thin then surface effects can have a
strong influence, if thick then they are less influential.
You can also enter values of h and B is
calculated.
Because the modeller is highly
interactive, you can easily play with all these input variables so don’t worry
if you get things wrong at the start. If you guess that 100 seconds would be a
good time-frame to model but see nothing much happening during the simulation
then click the Stop button and set it to, e.g. hours. If, on the other hand,
you set it to 100 days and the first simulation step gives a huge change then
you might want to try hours or minutes. For some settings the numerics will
blow up (that’s the nature of numerical modelling); you’ll get a polite message
suggesting you should try other parameters.
Whilst the modeller is running you see
the % concentration and time. If the concentration exceeds 50% (in absorption)
or goes below 50% (in desorption) then the t ½ (halftime) is automatically
recorded as this is a useful number.
Desorption
mode
If you are modelling Desorption you need
to set just one more parameter: the starting bulk concentration within the
polymer.
When you click the calculate button you
see two plots.
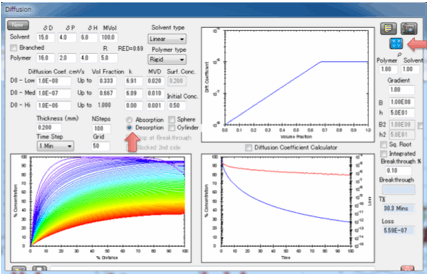
On the left you see the concentration
gradient throughout the polymer. It is assumed that the left-hand-side is open
to the atmosphere and that the right-hand-side is sealed (e.g. a coating on
metal). The right-hand plot shows the total weight of solvent in the sample
with time compared to the 100% at the start, i.e. normalized weight. By using
normalized weights we avoid complications of volumes and densities These two
plots are a full characterisation of the diffusing system. Moving your mouse
over any of the plots gives you a readout of the values at that position or
time. The right-hand plot also has a graph of “Loss”, i.e. the amount of
material that has come out from the polymer. When the Copy Diffusion Data to
Clipboard button is pressed, the concentration within the polymer plus the amount
lost over time is ready for pasting into, e.g. Excel.
Absorption
mode
So far we haven’t had to mention HSP.
That’s because HSP are totally irrelevant to everything so far. Diffusion
constants, for example, have zero dependence on HSP.
In one sense, HSP have nothing to do with
Absorption either. Given a surface concentration, everything else just follows
independent of HSP. The reason that HSP are so important is that they allow a
reasonable estimate of the effective surface concentration. With a RED number
of 0, the surface concentration will tend to 1 as the polymer is fully soluble.
As you travel beyond a RED number of 1, the surface concentration must be
falling rapidly as the polymer is hardly soluble. It is the HSP dependence on surface concentration that makes
permeation and breakthrough-time experiments valid for estimating HSP. Note that in these
permeation experiments solvents that might be “Outside” such as methanol,
can still come across as “Inside” in terms of breakthrough times, for example.
This is because the exceptionally high diffusion rate of methanol (small,
linear molecule) outweighs the low surface concentration. Similarly, many
“Inside” solvents show no breakthrough after a given fixed time because their
large molar volume, and/or the fact that they are cyclic/aromatic/branched
slows down the diffusion rate so much that their high surface concentration is
irrelevant.
In absorption mode you can choose to
accept the guesstimate for surface concentration based on the RED number calculated
from the solvent and polymer HSP, or you can enter your own value. You can also
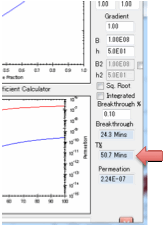
choose to stop the simulation at Breakthrough, i.e. the time the
first significant concentration of solvent arrives at the surface. What
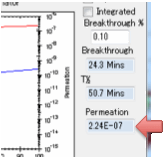
constitutes “significant”? That’s for you to judge. Enter a value in Breakthrough % which defines the % of the Surface
Concentration at the absorbing side above which the solvent is considered to
have broken through.
So if you set 1% for this value and the Surface
Concentration is 40% then Breakthrough is defined as 1% of 40% = 0.4%. For
“sharp” fronts (usually those with a strong dependence of diffusion rate on
concentration) this Breakthrough % value makes only a small difference. For
“shallow” fronts it can make a big difference. This isn’t a fault of the
modeller – it’s what happens in real life. In other words, for “shallow” fronts
your measured breakthrough time will depend on the sensitivity of your
breakthrough detector.
You can also choose to have the second
surface open (for when you are interested in e.g. permeation) or blocked (for
when you are interested in e.g. absorption into a polymer film with thickness L
coated onto a metal surface or absorption into a free film of thickness 2L).
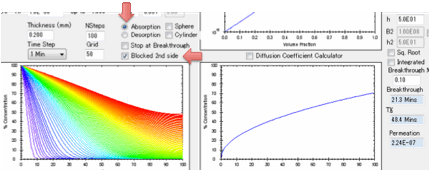
If the second surface is unblocked then
after breakthrough the permeation rate is calculated in
g/cm²/s.
These units are used because the
diffusion coefficients use cm rather than m and g seem more relevant than
moles. The value depends on the value of the solvent density ρ Solvent but not on ρ Polymer.
The two plots show, first, the
concentration throughout the sample, second the increase of weight from 0% up
to 100% which is defined as attaining your surface concentration. You can plot
this against linear time or against square-root time. Square-root time usually
gives a linear plot which is characteristic of basic (or Fickian) diffusion.
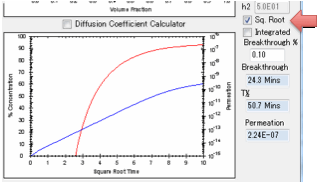
If you get a curve at the start, look for
a significant B value.
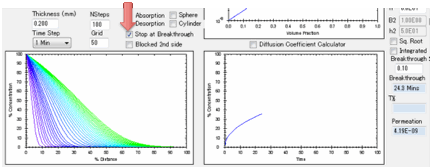
If you have not selected “Stop at
Breakthrough” then the permeation rate is also shown as a red line, using the
log-scale axis on the right of the plot. The scale for this is unknown as the
plot starts so you see the graph adjusting itself till things settle down. A
lower limit of 1E-16 is imposed on the log graph as 0 values are inadmissible
in a log plot.
Weight
%
Because all calculations are done on the
basis of the current volume fraction of solvent, they are most naturally viewed
in Volume terms. But typical experiments involve weight fractions. Given known
relative densities, conversion between the two modes should be simple. But the
main plots aren’t so much of % volume but % of starting concentration (for
Desorption) or % of fully absorbed (as defined by the Surface Concentration
term). These plots are therefore independent of Volume or Weight mode. To know
the absolute Volume and Weight fractions, you move your mouse over the graph
and get an automatic readout. If the Solvent and Polymer densities (ρ Solvent and ρ Polymer) are different from
1.00 then the Volume and Weight values will differ.
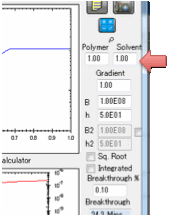
Gradient
This option is intended for skin
permeation where the diffusion coefficient of the permeant (the main
calculation) may well be influence by the presence of “permeation enhancers”.
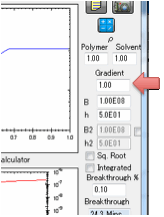
These enhancers will have a high
concentration at the outside and (presumably) zero concentration on the inside.
The simple assumption in the Gradient option is that the permeation enhancers
provide an X-fold increase in diffusion coefficient at the outside, linearly
tapering to the standard diffusion coefficient on the inside. Data suggest that
the effects are modest (X~5), but still significant.
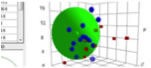
Sphere
and Cylinder options
The Fickian diffusion equations are no
different for a sphere (e.g. for controlled release of drugs) or a cylinder
(wrapped up as a torus to avoid discussions of edge effects). The key difference
is that towards the centre there is less relative volume so they both fill up
(or empty) faster than a single-sided plane and where the radius is the same as
the thickness of the planar sample. If you run either of these options, the
Blocked 2nd Side option is automatically selected to remind you that
the diffusion stops at the centre.
The shape of the concentration/distance
curve is unchanged. The shape of the filling/emptying curve is different
because of the volumetric effects. The sphere has 3 times the surface to volume
ratio of the (single-sided) plane and the cylinder is a factor of 2 so they
fill up (or empty) as Sphere>Cylinder>Plane.
Outputs
Clicking the Capture Screen button allows
you to place an image of the Diffusion output into a report in Word etc.
Clicking the Capture Diffusion data button puts all relevant data onto the
Clipboard in a format that can pasted directly into programs such as Excel.
This is useful for deeper analysis of diffusion/permeation data.
Summary
It is literally impossible for us to
provide you with an easy model that will answer all your questions. Diffusion
is amazingly complex, even though a single equation can be used to describe the
phenomena of greatest interest, and most of us simply don’t have enough data to
enter exact values for all the parameters.
But on the other hand we need to stress
the intrinsic simplicity that flows from your understanding of this complex
modeller. There are many myths about different types of diffusion (see the
eBook Diffusion chapter). Our belief is that there is only one type of
diffusion, the one we have mapped out in this modeller based on the simple
diffusion equation (Fick’s Second Law). Different types of diffusion behaviour
simply represent different regimes (rigid, elastomeric, solution, Mass Transfer
limited etc., or combinations of these) in the same system.
Please refer to e-Book,
HSP and Diffusion
It’s your call (Rational Selection of Chemical Protective Gloves)
Gloves: from minimum data to maximum insight